日本語EN
Download

ENECRA v1.7GuidebooksTeacher Tablet

Save as PDF1.5MB

The PDF has every spoiler step opened.

Minecraft add-on ENECRA v1.7

Teacher Tablet and ENECRA Missions

  • How to use the teacher tablet in lessons and training, and what is in the missions students work on.
  • With one tablet, the teacher sets missions, sees every student's progress and hands out what they need. Students work on the missions with their own ENECRA Tablet.
  • Quests for playing in Survival with the ENECRA Phone are in ENECRA Quest and the town’s residents.

Taken in ENECRA

1

Read this first

Please note
  • Only players with operator permission can start training.
  • When training starts, everyone taking part switches to Creative, the time is fixed at daytime, and the weather turns clear.
  • When training starts, everyone's items (including armor and the off-hand item) are kept safe, for the teacher and the students alike. They come back to the same slots when training ends (the teacher tablet, ENECRA Tablets and handouts are not kept. Anyone with a started phone is shut down first).
  • During training the ENECRA Phone can't be started, and there are no calls from residents or mail from the King.
  • During training, items thrown with the Q key come back to the player's hand (in case someone presses it by mistake).
  • Ending training leaves everyone in Creative. Students' progress is saved.
2

What you need

Teacher TabletFor the teacher. It is first in the "Tools" group of the Creative inventory.
ENECRA TabletFor students. When training starts, it is given automatically to the left end of each student's hotbar (it can't be let go of during training). It is collected when training ends.
WorldA world with ENECRA turned on. Students join the teacher's world.
3

Running a training session

  1. Hold and use the teacher tabletOn the power screen, press “Start training”. To run it in English, choose the language first with the globe button at the top left.
  2. Choose to resume or start newAppears only when there is a record of the previous training. “Resume” keeps students' progress, what they placed, the teams and the collected handouts. “Start new” starts everyone from the beginning.
  3. Choose the missions“Choose missions”, then “Solo missions” or “Team missions”, then the mission set. Students get their handouts and the missions begin.
  4. Watch over them“Progress list” shows each student's progress.
  5. Help students who are behindUse “Advance all”, “Give to one”, and back / on in the progress list.
  6. End the training“End training” collects the ENECRA Tablets and handouts and puts the time and weather back. Everyone gets back the items that were kept safe.
4

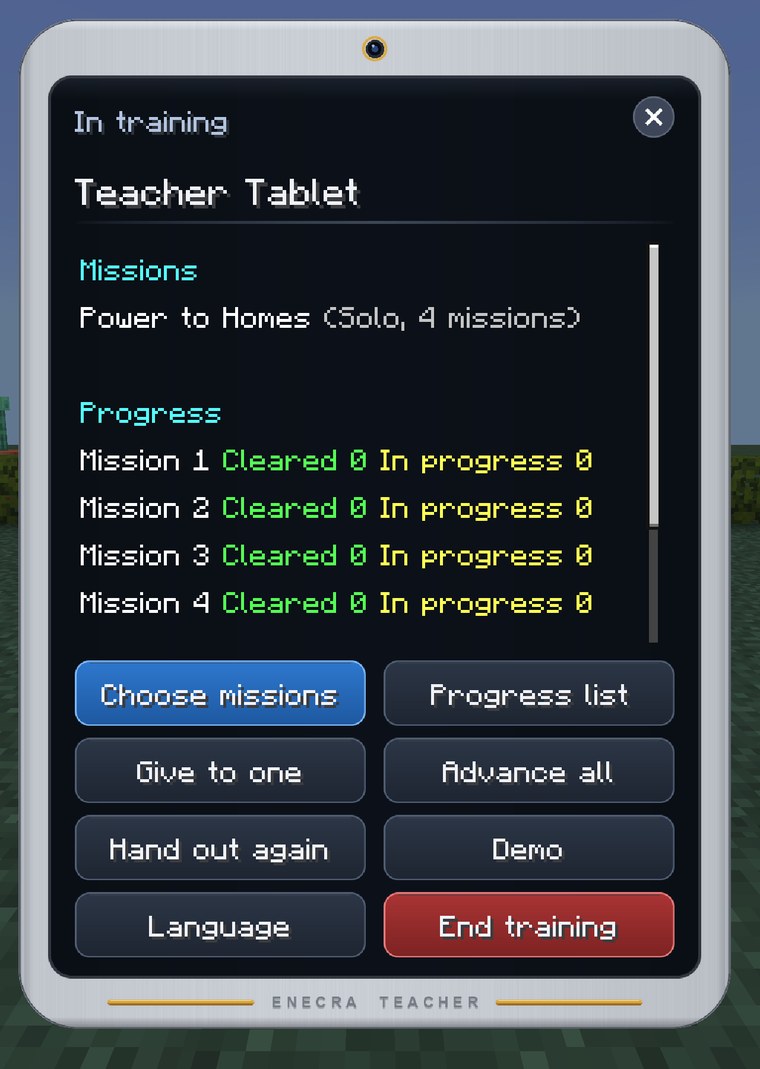
The teacher tablet screen

The teacher tablet screen
The teacher tablet screenDuring training

What the top of the screen shows

MissionsThe chosen mission set (solo or team).
ProgressFor solo missions: for each mission, how many have cleared it and how many are on it.
PlayersHow many students are taking part, and the time since training started.
TimeFixed at daytime during training, with clear weather.

Buttons

ButtonWhat it does
1Choose missionsChoose “Solo missions” or “Team missions”, then the mission set. Students then get the handouts for the first mission. Choosing again resets everyone's progress.
2Progress listEach student's current mission and how many they have cleared. Press a name to move just that student back or on, or to give them handouts.
3Give to oneGives handouts to just one student (solo missions: that mission's handouts; team mission: the builder for that student's crew).
4Advance allMoves students who are behind the chosen mission up to it (and hands out its items). Earlier missions stay not cleared and can still be cleared later. Solo missions only.
5Hand out againHands out the current mission's handouts to every student again.
6DemoThe teacher can work through any mission on the same mission screen as the students. Demo progress doesn't go into the progress list.
7Build SpaceAppears only in worlds that have Build Space plots (such as the playable world Tsuruga & Mihama). “Assign in (area)” moves unassigned students, in the order they joined, to free spots from No. 1 in that area. “Return all” moves the students here to their own Build Spaces. You can also go to a sample plot, or to a student's Build Space with “Visit a space”. Before using the same world for the next session, use “Unassign all”.
8LanguageChooses the world's language (Japanese / English). Everyone's screens and the signs in the world switch to it (students who changed only their own language go back to it too).
9End trainingCollects the ENECRA Tablets and the mission handouts from everyone and releases the fixed time and weather (game mode stays Creative). Gives everyone back the items kept at the start of training. Students' progress is saved, and next time you can choose “Resume” (the collected handouts come back too).

Before training, the power screen has “Start training” and a globe button (language) at the top left. In worlds that have Build Space plots, “Build Space” also appears after “Demo”.

5

The student's ENECRA Tablet

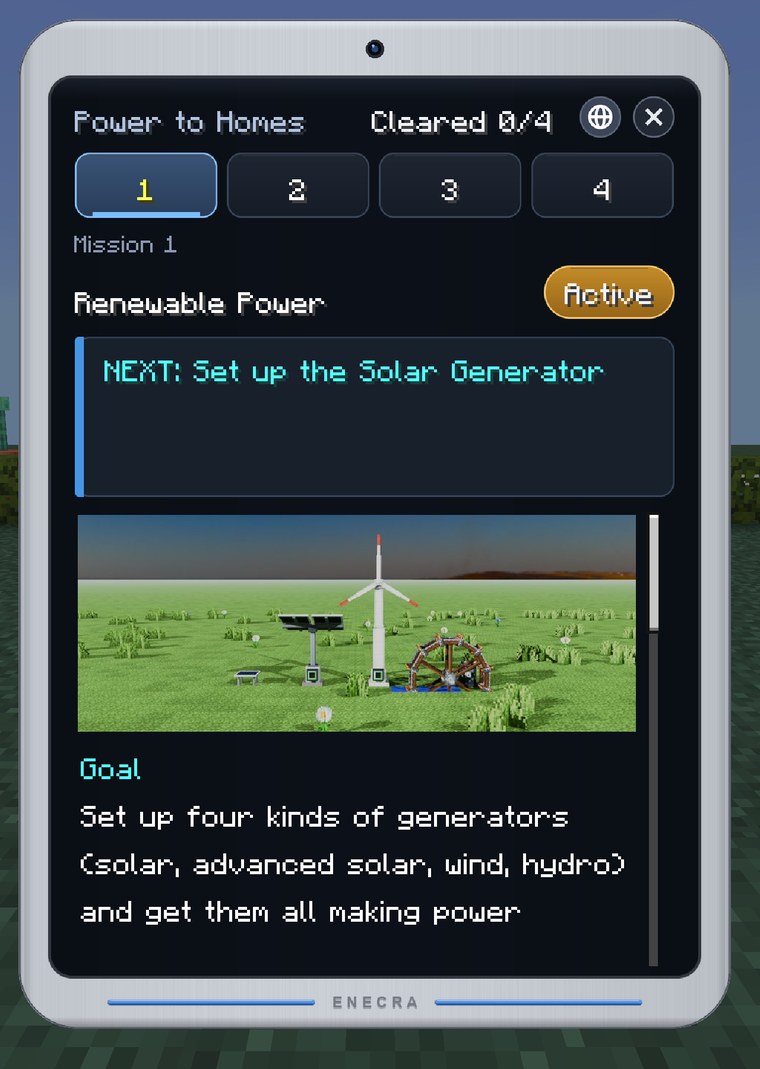
The student's mission screen
The student's mission screenSolo mission 1 (tabs 1 to 4 at the top)
  • Until the teacher chooses the missions, a screen waiting for the missions to start is shown.
  • The mission screen shows the mission set's name and how many are cleared at the top, with tabs 1 to 4. Press a tab to see that mission.
  • Each mission shows its status (cleared or not), what to do next, a picture of the finished build, the goal, the steps (how far along you are), the handouts and key points.
  • The top right of the game screen shows the current mission and step number (for example, Mission 3-4) and what to do next (the step list on the tablet uses the same numbers). In Missions 3 and 4, glowing dots mark the equipment used in the current step (only that student can see them).
  • There is a globe button on the top bar, to the left of the ×. It changes the language of that student's screens only (when the teacher changes the language, everyone goes back to the teacher's choice).
6

Solo missions: “Power to Homes”

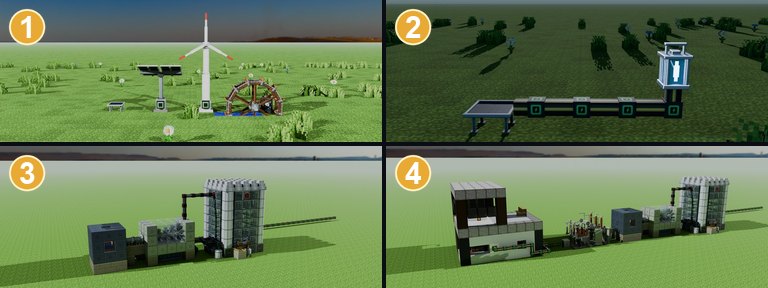
The finished pictures of the four solo missions

Make power with renewables and light an LED through a wire. Next, make power with a BWR reactor and send it through the main transformer and switchyard to the model house's breaker panel. Each student works through the 4 missions in order, in their own spot.

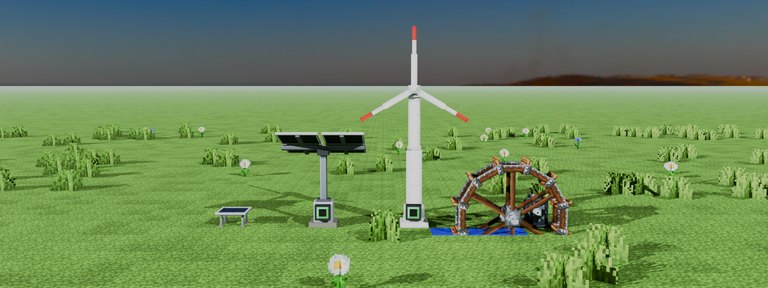
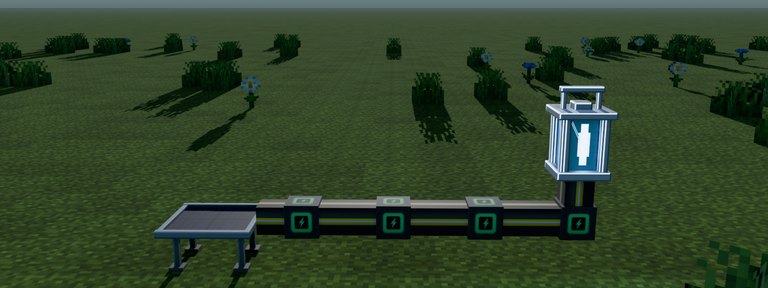
Finished picture for mission 1

1Renewable Power

Goal Set up four kinds of generators (solar, advanced solar, wind, hydro) and get them all making power

Steps
  1. Solar generator making power
  2. Advanced solar generator making power
  3. Wind generator making power
  4. Hydro generator making power
Handouts (given at the start of this mission)
Solar Generator x1Advanced Solar Generator x1Wind Generator x1Hydro Generator x1Water Bucket x1
Key points
  • Solar and advanced solar generators make power where there are no blocks directly above (where they can see the sky)
  • A wind generator makes power where there are no blocks above its blades
  • A hydro generator makes power when water hits one side of its wheel (put water next to the wheel with a water bucket)
Finished picture for mission 2

2Light an LED

Goal Run a wire from a working generator and light a blue LED

Steps
  1. Place an LED
  2. Connect it to a generator with wire to light it
Handouts (given at the start of this mission)
Blue LED x1Wire x64
Key points
  • Lay wire in a line between the things you connect (wires next to each other join up)
  • An LED won't light if the generator it's connected to is stopped
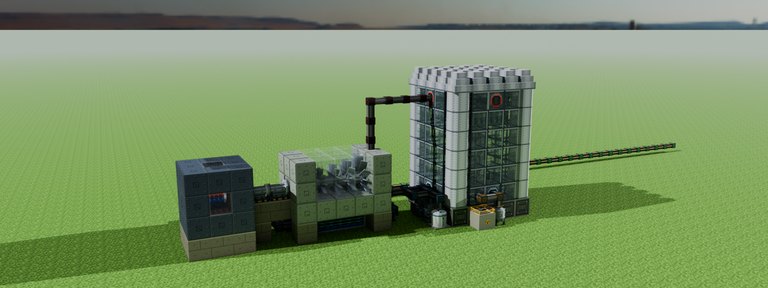
Finished picture for mission 3

3Run a Nuclear Plant

Goal Build a BWR reactor and turbine building, then start the reactor and make power

Steps
  1. Build the reactor
  2. Load fuel
  3. Secure feedwater
  4. Connect station power
  5. Send steam to the turbine
  6. Cooling the condenser
  7. Powering the condensate pump
  8. Returning the feedwater
  9. Start the reactor
  10. Start making power
Handouts (given at the start of this mission)
BWR Reactor Builder x1Uranium Dioxide Fuel x10Wire x64Turbine Builder x1Steam Pipe x64Water Pipe x64
Key points
  • A BWR reactor boils the water inside with the heat from fission, and the steam turns a turbine to make power
  • Right-click the main control panel to see the operating status and the next step (hint)
  • Port colors on machines: green port = wire, light-blue port = water pipe, red port = steam pipe (water pipes don't connect to a pump's green port, and wires don't connect to its light-blue ports)
  • Station power (power to run the reactor) and power for the feedwater pump come by wire from a working generator
  • You can load up to 5 fuel rods into a reactor nozzle (middle of the 2nd row from the bottom, on the 3 faces other than the front with the main control panel). The nozzles on the right and back have pipes attached, so load fuel into the nozzle on the left face. Fuel gets used up as it runs, so add more later
  • Put fuel in the fuel tank behind the reactor and the fuel pipe refills it automatically
  • Power the recirculation pumps on the left and right of the reactor for 100% output (without them, natural circulation gives 50%)
  • Powering the circulating water pump cools the condenser with sea or river water
  • The emergency diesel generator (to the left of the spot in front of the station power panel) links up when you place a wire in front of the station power panel; when the reactor stops, it starts by itself and powers the main control panel and pumps
  • Station power (main control panel and pumps) totals about 2.2kW (recirculation pumps 0.5kW x2, circulating water pump 0.6kW, feedwater pump 0.3kW, condensate pump 0.2kW, main control panel 0.1kW). Wire it to the generators you placed in Mission 1 (solar 1kW, advanced solar 6kW, wind about 1kW, hydro 0.45kW). If one isn't enough, connect several
  • The condensate pump draws water (condensate) out of the condenser and sends it to the feedwater pump (from the port at the left end of the condenser, through the condensate pump, then the feedwater pump, to the reactor). Wire the condensate pump too
  • If you built in the wrong place, Builder Undo takes back your builders one at a time, newest first (the builders come back to your inventory too)
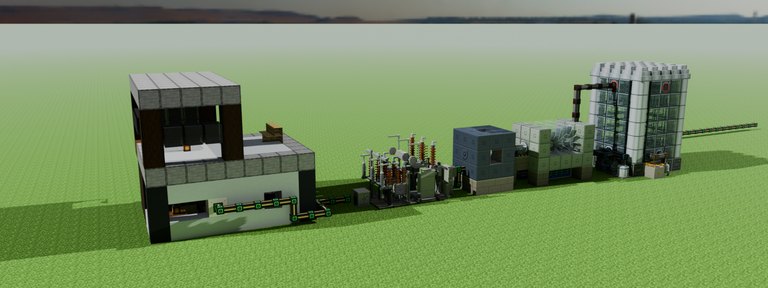
Finished picture for mission 4

4Power to the House

Goal Build a main transformer and switchyard at the power plant's exit, and send the nuclear plant's power to the model house's breaker panel

Steps
  1. Build the main transformer and switchyard
  2. Build the model house
  3. Connect to the breaker panel
  4. Get power from the nuclear plant
Handouts (given at the start of this mission)
Transformer & Switchyard Builder (Compact) x1Model House Builder x1Wire x64Power Cord (White) x64
Key points
  • The main transformer raises the voltage of the generator's power (about 20,000 volts) to send it far (a substation's job). The switchyard (gas circuit breaker and line take-off structure) connects and cuts the power line
  • Hold the Transformer & Switchyard Builder (Compact) and right-click the generator terminal (green port at the bottom of the generator's end) to build in front of it (if the space in front isn't clear, right-click open ground to build). Then connect a wire from the generator terminal to the green port of the plant inlet
  • The breaker panel is inside the house wall. Connect the wire from the plant outlet to the green port on the back of the breaker panel, on the outside wall of the house
  • For the ceiling light, hold a power cord and right-click the ceiling outlet, then the ceiling light (it lights when the house has power)
  • If you built in the wrong place, Builder Undo takes back your builders one at a time, newest first (the builders come back to your inventory too)
7

Team mission: “Light Up the Town with a PWR”

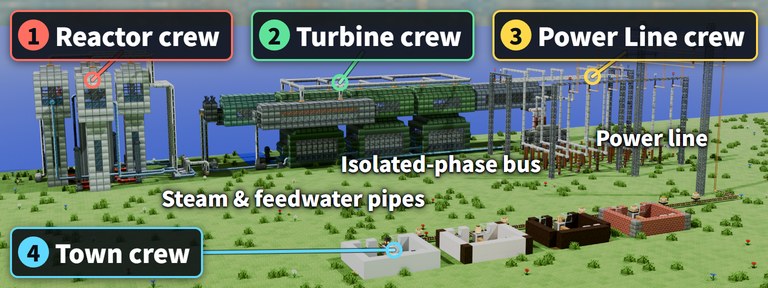
What the finished team mission looks like

Build and run a PWR nuclear plant as a team and bring power to every team member's house.

Forming teams

  • When the teacher chooses a team mission in “Choose missions”, a screen for choosing a team appears on the students' ENECRA Tablets.
  • Students press a color button to make a team, or to join it if it already exists (up to 8 teams, any number of members, and they can leave if they join the wrong one).
  • Once in a team, pressing a crew button gives that crew's builder and puts the student on that crew. Any number of students can share a crew, and one student can take two (one student can even do all four).
  • During team missions, the turbine and switchyard builders leave the connections unbuilt (students place them by hand).

The four crews (in the order power flows)

1 Reactor crewPWR Plant Builder Equipment that heats the primary coolant with fission heat and turns the secondary water into steam in the steam generator
Job Build the reactor with the Reactor Builder, load fuel with "Refuel" on the main control panel, and go through the startup steps
Connects at Connect to the turbine crew's equipment at the front nozzles (main steam, feedwater)
2 Turbine crewPWR Turbine-Generator Builder Equipment that spins the turbine with steam and makes power with the generator
Job Build the turbine row near the reactor with the Turbine Generator Builder, connect it to the reactor with the main steam and feedwater pipes, and run the circulating (cooling) water
Connects at Connect to the power line crew's equipment with the isolated phase bus behind the generator
3 Power Line crewPWR Transformer & Switchyard Builder Equipment that raises the voltage and sends power to faraway towns
Job Build the switchyard near the generator with the Transformer/Switchyard Builder and connect the isolated phase bus by phase color (A red, B white, C blue)
Connects at Connect to the town crew's houses with the power line from the tower to the town
4 Town crewModel House Builder Houses that use power
Job Build a house with the Model House Builder and connect the power line to the green port on the back of the breaker panel, on the outside wall of the house
Connects at Receive the power line coming from the power line crew

How it goes

  1. Reactor crew: build the reactor with the Reactor Builder and load fuel with "Refuel" on the main control panel
  2. Turbine crew: build the turbine row near the reactor with the Turbine Generator Builder and connect it to the reactor with the main steam pipe (white) and the feedwater pipe (light blue). Put the water intake in sea or river water
  3. Power line crew: build the switchyard with the Transformer/Switchyard Builder and connect it to the generator with the isolated phase bus (A red, B white, C blue)
  4. Town crew: build houses with the Model House Builder and connect the power line from the tower to each house's breaker panel
  5. Go through the startup steps on the main control panel to make power. Cleared when every team member's house gets power
8

Troubleshooting

ProblemCauseWhat to do
Training won't start on the teacher tabletNo operator permissionOnly players with operator permission can start training. During training, only the teacher who started it and operators can use it.
A student threw away or lost their ENECRA Tablet―During training, the ENECRA Tablet comes back to the left end of the hotbar automatically.
A student threw items away with the Q keyPressed by mistakeDuring training, items thrown with the Q key come back to the student's hand (items that drop from breaking blocks don't).
Handouts were lost or there aren't enough―The teacher can send handouts to just that student from “Give to one” (they arrive without the teacher going there). To hand out to everyone again, use “Hand out again”.
Some students are behind―Use “Advance all” to move them up to the chosen mission. For just one student, press their name in “Progress list” and move them on or back.
Training was ended by mistake―Press “Start training” again and choose “Resume”: students' progress, what they placed and the teams all come back as they were.
The ENECRA Phone won't start during trainingIt can't be started during training (by design)It works after training ends (everyone is in Creative during training).
Progress disappeared after choosing missions againChoosing again starts over (by design)A confirmation screen appears before choosing again. To continue where you were, don't choose again.
A building went in the wrong place―Builder Undo takes back the builders you used, newest first, one at a time (the builder comes back to your inventory too).
The builder didn't build (red dots appeared)The spot overlaps with something elseAt an overlapping spot, the first right-click doesn't build: it shows the overlapping blocks (red dots) and which way to move. Move it and try again, or right-click the same spot again within 30 seconds to build it anyway.
I want the screens in English (or Japanese)―Use “Language” on the teacher tablet (before training, the globe button on the power screen) to change it for everyone. A student can change only their own with the globe button on the ENECRA Tablet's top bar. Block and item names follow Minecraft's own language setting.

Made by UKABU Inc. (hello@ukabu.world) | Terms of use
Unofficial mod content. Not approved by Mojang or Microsoft.